-
Java Thread Pool 알아보기Java 2023. 9. 30. 11:48728x90반응형

- 목차
관련된 글
https://westlife0615.tistory.com/318
Java Future 알아보기
- 목차 관련된 글 https://westlife0615.tistory.com/319 Java Thread Pool 알아보기 - 목차 소개. Thread Pool 은 Worker Thread 들을 관리하는 자료구조입니다. Thread Pool 은 최대로 할당 가능한 Thread 갯수를 제한하며, Wo
westlife0615.tistory.com
소개.
Thread Pool 은 Thread 를 관리하는 자료구조입니다.
Thread Pool 이 Thread 를 관리한다는 의미는 Thread 의 생성과 삭제 그리고 재사용성을 높이기 위한 매커니즘이 있음을 뜻합니다.
만약 어떤 프로그램이 10개의 Thread 를 사용해야한다고 가정하겠습니다.
이때, 10개의 Thread 를 관리하는 Thread Pool 1개를 생성하여 Thread 관리를 Thread Pool 에게 위임합니다.
사용자는 그거 Thread Pool 을 생성하고 그 Thread Pool 에게 작업을 지시하기만 하면 되죠.
Thread Pool 은 사용해야하는 모든 Thread 를 사전에 생성해둡니다. (FixedSizeThreadPool)
size 가 10인 Thread Pool 은 10개의 Thread 를 미리 생성해둡니다.
그리고 사용자가 비동기 작업을 수행해야할 때마다
Thread Pool 이 관리하는 하나의 Thread 를 사용합니다.
만약 모든 Thread 가 Running 상태라면 11 번째 Thread 사용 요청은 Thread Pool 이 Thread 를 제공해줄 때까지 대기합니다.
Thread Pool 은 관리하는 Thread 들을 최대한 재사용하는 정책을 가지며, 생성과 삭제를 최소화하여 Overhead 를 줄입니다.
그리고 submit 이라는 API를 통해서 프로그램과 Thread Pool 은 소통하게 됩니다.
void submit(Runnable task) void submit(Callable task ) 인터페이스를 통하여
Thread Pool 이 실행한 Task 들이 Task Queue 에 쌓이게 됩니다.
결론적으로 Thread Pool 은 Thread 의 라이프사이클을 책임지고 관리합니다.
사용자는 그저 비동기 작업에 대한 로직만 submit API로 제공하기만 하면 되죠.
그 이후의 병렬처리는 Thread Pool 이 책임지고 수행해줍니다.
<Thread Pool 구조>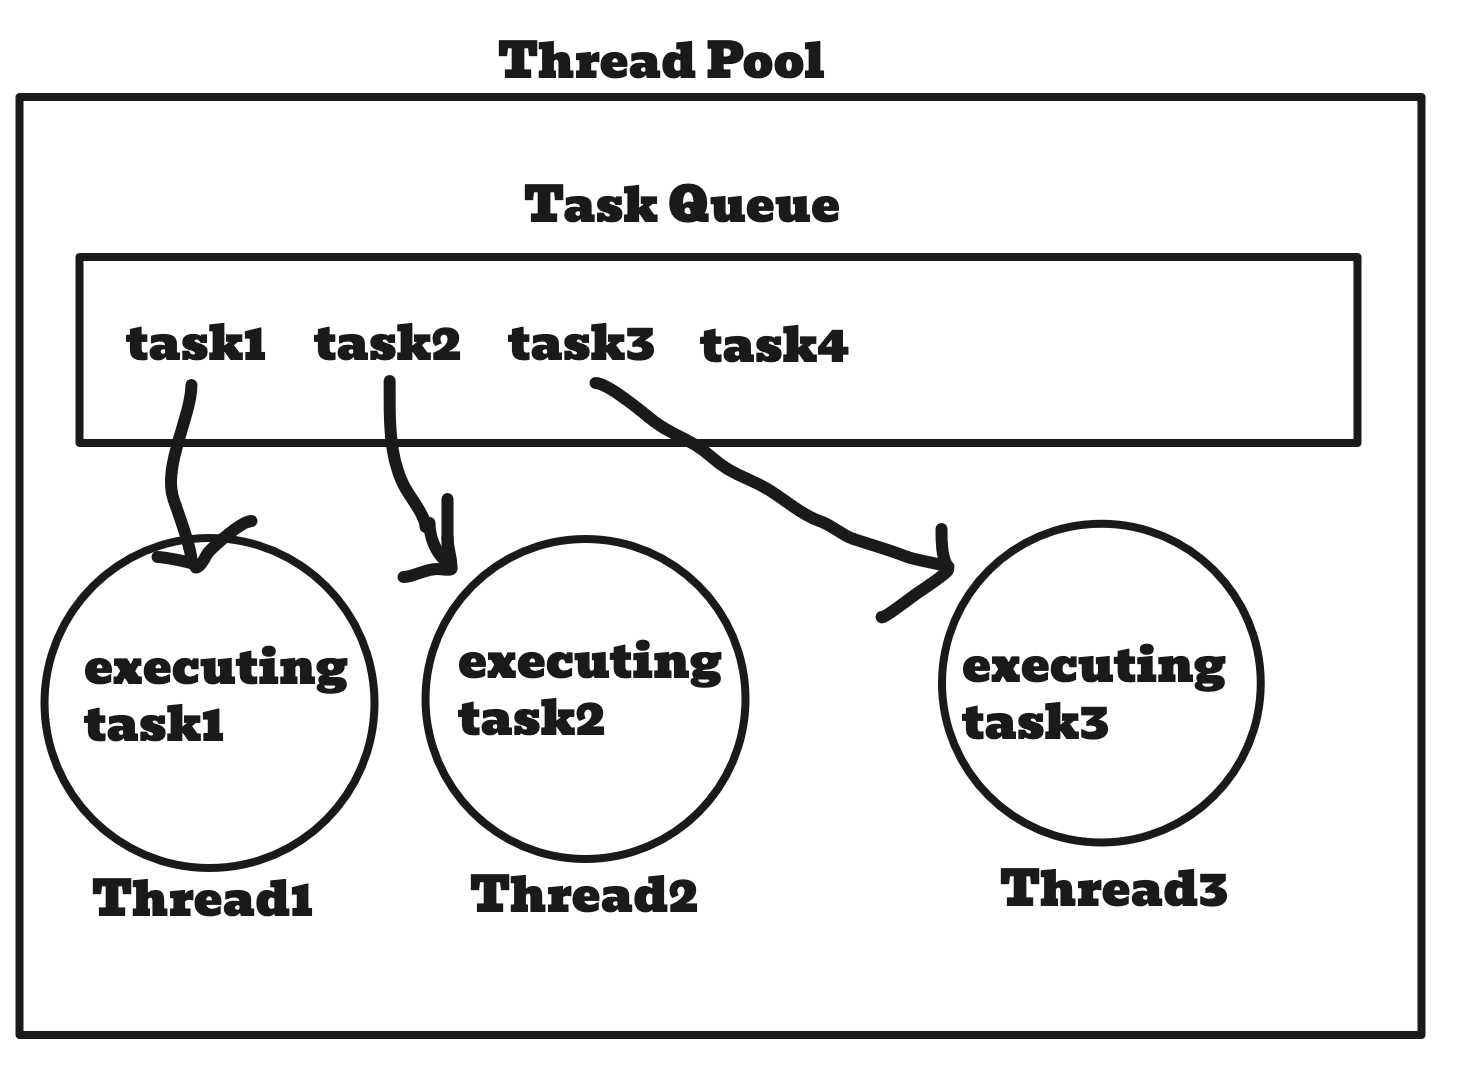
아래는 제가 간단하게 만든 Thread Pool 의 구조입니다.
Thread Pool 의 직관적인 이해를 위해서 가볍게 구성해보았습니다.
간단히 Print 하는 Task 6 개를 CustomThreadPool 에서 실행하고자 합니다.
Thread Pool 의 Size 는 3 이여서 Task 들이 3개씩 실행됩니다.
CustomThreadPool 객체를 생성하였고,
생성된 Thread Pool 에게 submit api를 통해서 비동기 로직을 전달합니다.
비동기 로직은 Runnable 로 만들어져야합니다.
package org.example;

import java.util.Queue;
import java.util.concurrent.LinkedBlockingQueue;

public class Main {
  public static void main(String[] args) throws InterruptedException {

    // Custom Thread Pool 을 생성합니다.
    CustomThreadPool threadPool = new CustomThreadPool(3);

    // 6개의 Task 를 Thread Pool 에 할당합니다.
    threadPool.submit(() -> {
      System.out.println("Hi My Name is one. and i am in thread " + Thread.currentThread().getName());
    });
    threadPool.submit(() -> {
      System.out.println("Hi My Name is two. and i am in thread " + Thread.currentThread().getName());
    });
    threadPool.submit(() -> {
      System.out.println("Hi My Name is three. and i am in thread " + Thread.currentThread().getName());
    });
    threadPool.submit(() -> {
      System.out.println("Hi My Name is four. and i am in thread " + Thread.currentThread().getName());
    });
    threadPool.submit(() -> {
      System.out.println("Hi My Name is five. and i am in thread " + Thread.currentThread().getName());
    });
    threadPool.submit(() -> {
      System.out.println("Hi My Name is six. and i am in thread " + Thread.currentThread().getName());
    });

    // Main Thread 가 종료되게 하지 않게 위함입니다.
    while (true) {}
  }

}

class CustomThreadPool {

  // Thread Pool 사이즈
  int poolSize;

  Queue<Thread> pool;
  Queue<Runnable> taskQueue;

  // Thread Pool 의 모든 Thread 들은 Task Queue 에 추가된 Task 를
  // 획득하여 실행합니다.
  Runnable worker = () -> {
    while (true) {
      if (this.taskQueue.peek() != null) {
        Runnable runnable = this.taskQueue.remove();
        runnable.run();
      }
    }
  };

  CustomThreadPool (int size) {
    this.poolSize = size;
    this.pool = new LinkedBlockingQueue<>();
    this.taskQueue = new LinkedBlockingQueue<>();
    this.startCustomThreadPool();
  }

  // Thread Pool 의 사이즈에 맞게 Thread 를 생성합니다.
  void startCustomThreadPool() {
    for (int i = 0; i < this.poolSize; i++) {
      Thread newThread = new Thread(worker);
      newThread.setName("Custom-Thread-Pool-" + i);
      this.pool.add(newThread);
      newThread.start();
    }
  }

  // Task 를 Task Queue 에 추가합니다.
  void submit(Runnable runnable) {
    this.taskQueue.add(runnable);
  }


}
<실행 결과>Hi My Name is three. and i am in thread Custom-Thread-Pool-0 Hi My Name is one. and i am in thread Custom-Thread-Pool-1 Hi My Name is two. and i am in thread Custom-Thread-Pool-2 Hi My Name is six. and i am in thread Custom-Thread-Pool-2 Hi My Name is five. and i am in thread Custom-Thread-Pool-0 Hi My Name is four. and i am in thread Custom-Thread-Pool-1
아래는 profiling 결과인데요. 3개의 Thread 가 6개의 작업을 처리합니다.
Thread Overhead.
먼저 Thread 의 Overhead 를 간단히 요약을 해보겠습니다.
1. Thread 하나가 생성되면 Call Stack, Thread Control Block 등을 위한 메모리가 필요합니다.
2. Thread 가 너무 많이 생성되면 Thread Scheduler 에 의해서 과도한 Context Switching 이 생깁니다.
이것은 중요한 작업의 퍼포먼스에 악영항을 끼칠 수 있습니다.
3. Thread 의 생성과 삭제 시에 위에서 정리하는 데이터를 만들거나 지우는 과정이 필요합니다.
(그래서 재사용하는 방식이 권장됨)Thread Pool 을 사용하면 Thread 의 Overhead 를 줄일 수 있는 장점이 있습니다.
그래서 Thread Overhead 에 대해서 알아보려고 합니다.
하나의 Process 내부에는 여러 개의 Thread 는 만들어질 수 있습니다.
Thread 는 각각 실행의 단위이기 때문에 CPU 를 점유하고, 자체적인 Call Stack 을 가집니다.
이 뜻은 CPU 의 Register 정보나 Priority 등을 저장할 Thread Control Block 저장 공간이 필요하고,
Call Stack 또한 메모리를 차지하게 됩니다.
그리고 Thread 또한 Time-Shared 방식으로 스케줄링해야하기 때문에 이 또한 OS 관점에서의 추가적인 리소스입니다.
그래서 Thread 를 생성하고 삭제하는 과정과 올바르게 Clean-Up 하지 않게 되었을 때 발생하는 문제점들이 있으며,
이러한 Overhead 를 줄이는 관점에서 Thread Pool 이 탄생하게 되었습니다.
Thread Pool 구조.
Thread Pool 의 구조는 아래와 같습니다.
Task Queue.
사용자가 생성된 Thread Pool 에 task 를 submit 할 수 있습니다.
Thread Pool 은 사용자가 Task 를 제공하는 Interface 를 가지고 있고,
그 interface 는 void submit(Runnable task) 와 같은 형식입니다.
Task 는 대체로 Runnable 타입입니다.
Runnable 인스턴스들이 Task Queue 에 추가되고,
적절한 Thread 에 배치되어 실행됩니다.
Thread Pool.
실질적으로 생성된 Thread 들을 관리하는 Pool 입니다.
Thread Pool 의 종류에 따라서 동적으로 Thread 를 생성할 수도 있고, 사전에 모든 Thread 들을 생성할 수도 있습니다.
어찌되었든 Pool 은 생성된 Thread 들을 관리하고, 재사용할 수 있게합니다.
Thread.
Thread Pool 의 Thread 들은 각각 Task Queue 에서 실행 가능할 Task 를 찾아 실행합니다.
이는 구현 방식에 따라 다양하지만 제가 경험한 방식에선 모든 Thread 가 Task Queue 의 Runnable 1개를 fetch 하여
그 Runnable 을 실행하는 방식이었습니다.
그래서 Thread Pool 의 대략적인 Task 수행 과정을 적어보면,
1. Thread Pool 사이즈에 맞게 Thread 생성.
모든 Thread 들은 Task Queue 에서 실행 가능한 Task 를 찾습니다.
그리고 실행 가능한 Task 가 있다면 Runnable Task 를 수행합니다.List<Thread> threadPool = new ArrayList(); for (int index = 0; index < threadPoolSize; index++) { Thread thread = new Thread(() -> { while (true) { Runnable task = taskQueue.dequeue(); if (task != null) { task.run(); } } }); threadPool.add(thread); }2. 사용자가 Thread Pool 에 Task 를 submit.
ThreadPool threadPool = new ThreadPool();

threadPool.submit(() -> {
	print("test1");
});

threadPool.submit(() -> {
	print("test2");
});

threadPool.submit(() -> {
	print("test3");
});

threadPool.submit(() -> {
	print("test4");
});
KeepAliveTime.
Thread 는 Keep Alive Time 값을 가집니다.
Idle 상태의 Thread 가 Thread Pool 에서 지속될 수 있는 시간입니다.
keep alive time 이 지난 Idle Thread 는 Pool 에서 제거됩니다.
프로그램이 특정 기간동안 사용하지 않는 Thread 는 유지시키는 것이 의미가 없기 때문에
자원 낭비를 최소화하기 위해서 Keep Alive Time 이 지난 Thread 는 제거됩니다.
관련 예시를 한번 살펴보겠습니다.
아래 예시에는 coreThreadSize 이 3개, maxThreadSize 가 6개이고 keepAliveTime 이 10초인 Thread Pool 이 존재합니다.
최소 3개에서 최대 6개까지의 Thread 를 가질 수 있는 Thread Pool 이구요.
4 개의 Task 를 할당하여 Thread Pool 의 Worker Thread 는 4개까지 늘렸다가
Keep Alive Time 이후에 1개의 Thread 가 제거되는지에 대한 테스트입니다.
결과적으로 keepAliveTime 인 10초 이후에 1개의 Thread 는 제거됨을 알 수 있습니다.
package org.example;

import java.lang.reflect.Field;
import java.time.Instant;
import java.time.temporal.ChronoUnit;
import java.util.HashSet;
import java.util.concurrent.ExecutorService;
import java.util.concurrent.SynchronousQueue;
import java.util.concurrent.ThreadPoolExecutor;
import java.util.concurrent.TimeUnit;

public class Main {

  public static void main(String[] args) throws NoSuchFieldException, IllegalAccessException, InterruptedException {

    int coreThreadSize = 3;
    int maxThreadSize = 6;
    long keepAliveTime = 10L;

    ExecutorService threadPool = new ThreadPoolExecutor(
            coreThreadSize,
            maxThreadSize,
            keepAliveTime,
            TimeUnit.SECONDS,
            new SynchronousQueue<Runnable>()
    );

    for (int i = 1; i <= 4; i++) {
      threadPool.submit(() -> {
        System.out.printf("thread is %s%n", Thread.currentThread().getName());
      });
    }

    Thread.sleep(1000l);
    Field workers = ThreadPoolExecutor.class.getDeclaredField("workers");
    workers.setAccessible(true);
    HashSet threadPoolWorkers = (HashSet) workers.get(threadPool);
    System.out.printf("thread size is %s", threadPoolWorkers.size());

    Instant afterKeepAliveTime = Instant.now().plus(keepAliveTime + 5, ChronoUnit.SECONDS);
    while (Instant.now().isBefore(afterKeepAliveTime)) {}

    threadPoolWorkers = (HashSet) workers.get(threadPool);
    System.out.printf("after keep alive time, thread size is %s", threadPoolWorkers.size());

  }


}
<실행 결과>thread is pool-1-thread-2 thread is pool-1-thread-1 thread is pool-1-thread-3 thread is pool-1-thread-4 thread size is 4 after keep alive time, thread size is 3
<추후 살펴볼 내용>
ExecutorService. FixedSize.반응형'Java' 카테고리의 다른 글
[Java] 익명 클래스와 메모리 관계 알아보기 ( Anonymous Class , Method Area ) (0) 2024.06.02 Jackson 으로 JSON 다루기 (0) 2024.01.22 Java off-heap 메모리 알아보기 (0) 2023.12.22 Java Future 알아보기 (0) 2023.09.30 java Annotation 이해하기 (0) 2023.09.25